YOLOv3 in PyTorch > ONNX > CoreML > TFLite

Overview
 

CI CPU testing

This repository represents Ultralytics open-source research into future object detection methods, and incorporates lessons learned and best practices evolved over thousands of hours of training and evolution on anonymized client datasets. All code and models are under active development, and are subject to modification or deletion without notice. Use at your own risk.

YOLOv5-P5 640 Figure (click to expand)

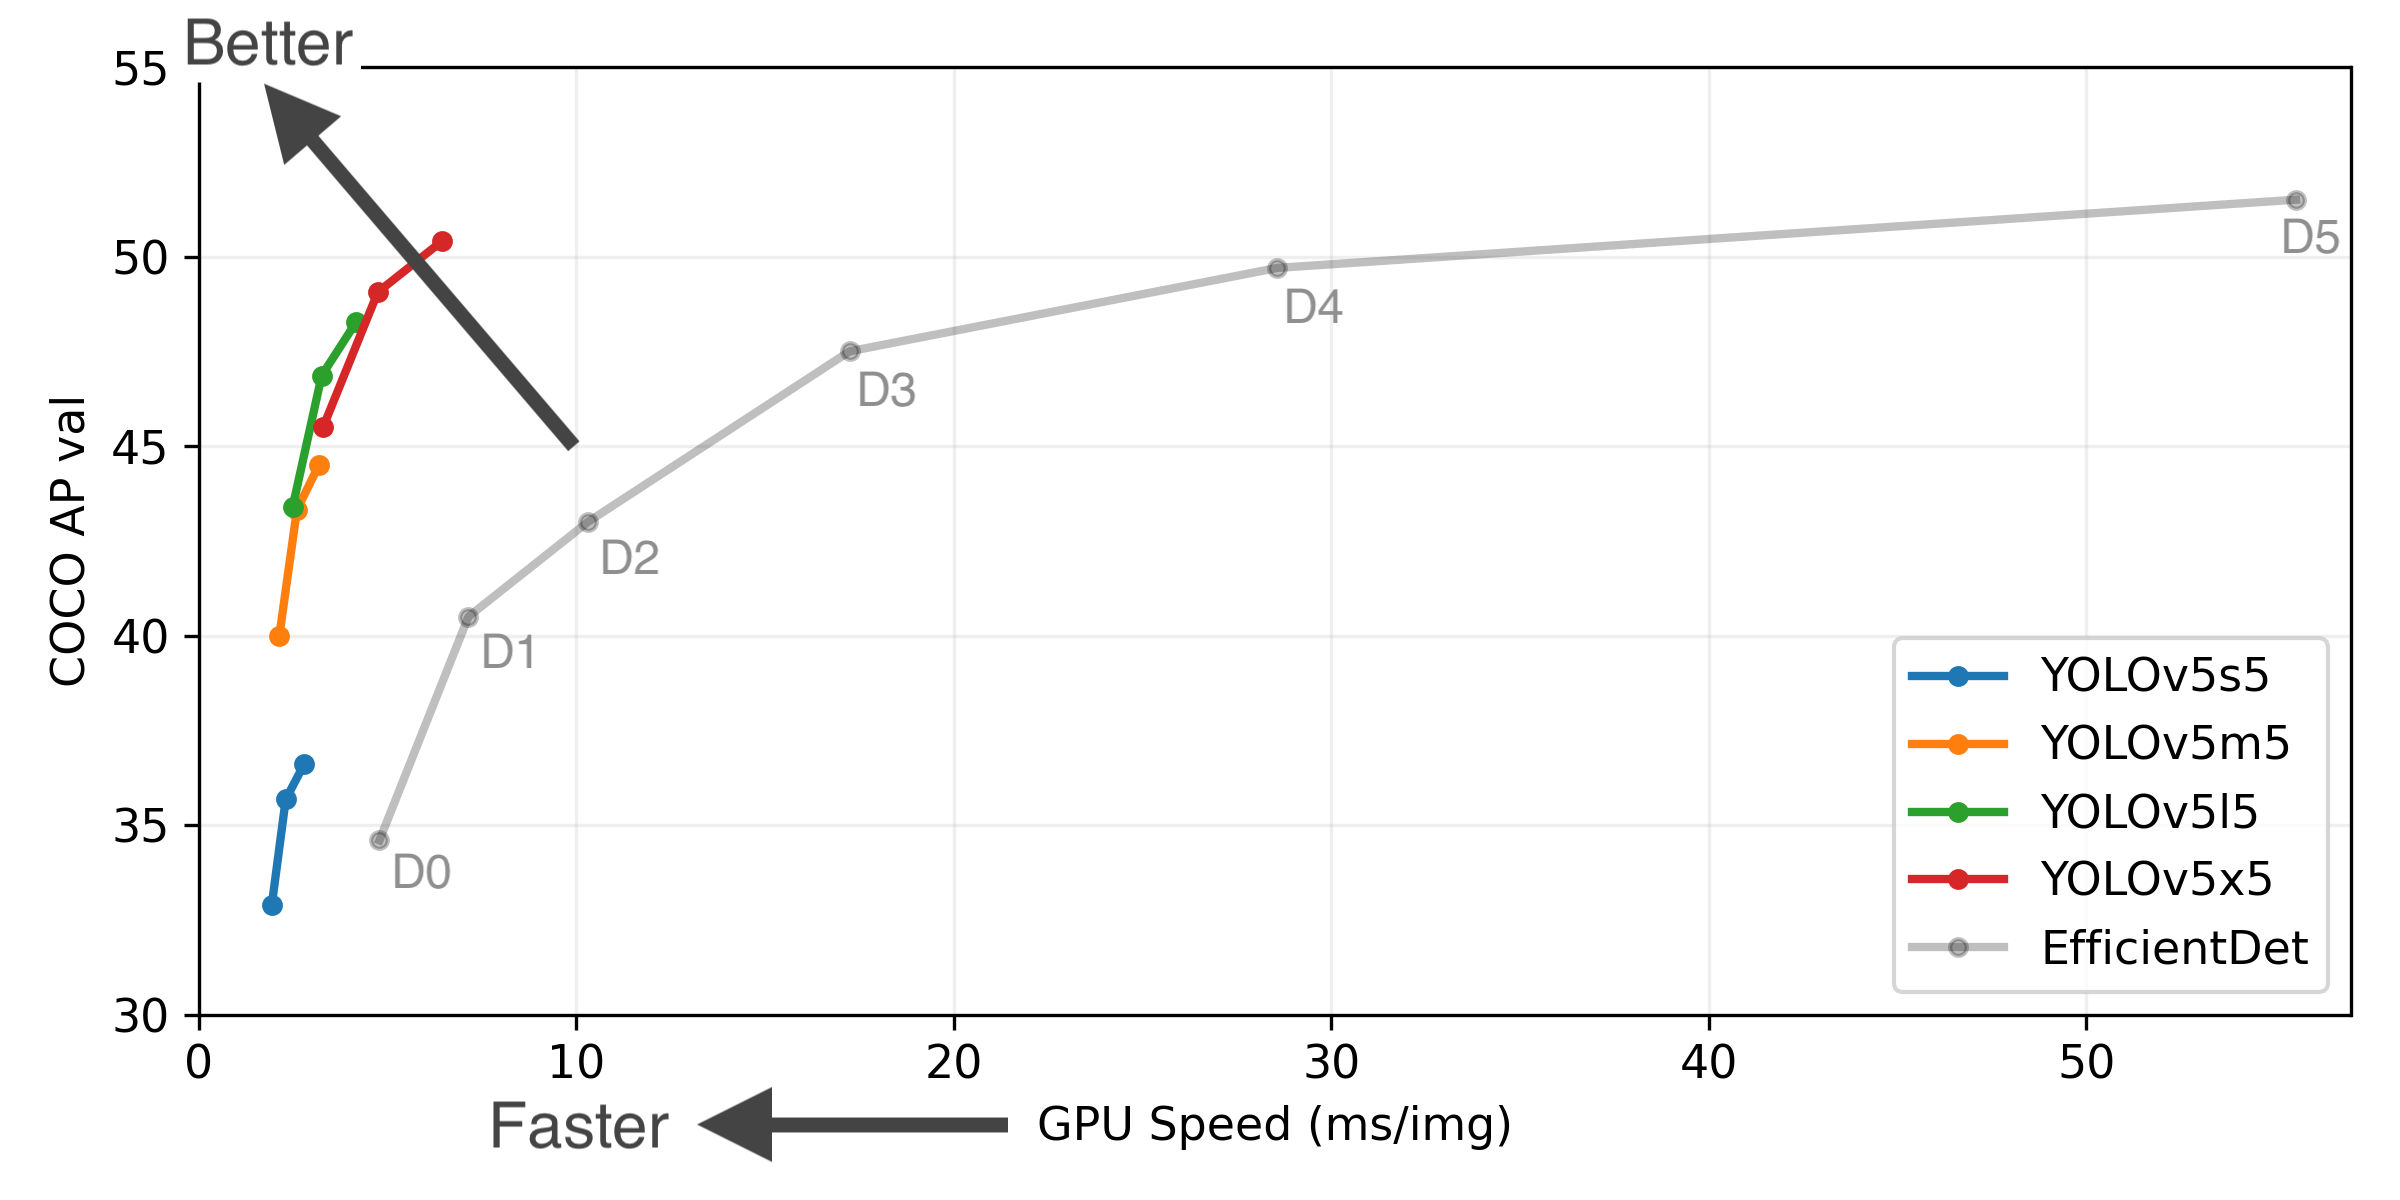
Figure Notes (click to expand)
  • GPU Speed measures end-to-end time per image averaged over 5000 COCO val2017 images using a V100 GPU with batch size 32, and includes image preprocessing, PyTorch FP16 inference, postprocessing and NMS.
  • EfficientDet data from google/automl at batch size 8.
  • Reproduce by python test.py --task study --data coco.yaml --iou 0.7 --weights yolov3.pt yolov3-spp.pt yolov3-tiny.pt yolov5l.pt

Branch Notice

The ultralytics/yolov3 repository is now divided into two branches:

$ git clone https://github.com/ultralytics/yolov3  # master branch (default)
  • Archive branch: Backwards-compatible with original darknet *.cfg models (no longer maintained ⚠️ ).
$ git clone https://github.com/ultralytics/yolov3 -b archive  # archive branch

Pretrained Checkpoints

Model size
(pixels)
mAPval
0.5:0.95
mAPtest
0.5:0.95
mAPval
0.5
Speed
V100 (ms)
params
(M)
FLOPS
640 (B)
YOLOv3-tiny 640 17.6 17.6 34.8 1.2 8.8 13.2
YOLOv3 640 43.3 43.3 63.0 4.1 61.9 156.3
YOLOv3-SPP 640 44.3 44.3 64.6 4.1 63.0 157.1
YOLOv5l 640 48.2 48.2 66.9 3.7 47.0 115.4
Table Notes (click to expand)
  • APtest denotes COCO test-dev2017 server results, all other AP results denote val2017 accuracy.
  • AP values are for single-model single-scale unless otherwise noted. Reproduce mAP by python test.py --data coco.yaml --img 640 --conf 0.001 --iou 0.65
  • SpeedGPU averaged over 5000 COCO val2017 images using a GCP n1-standard-16 V100 instance, and includes FP16 inference, postprocessing and NMS. Reproduce speed by python test.py --data coco.yaml --img 640 --conf 0.25 --iou 0.45
  • All checkpoints are trained to 300 epochs with default settings and hyperparameters (no autoaugmentation).

Requirements

Python 3.8 or later with all requirements.txt dependencies installed, including torch>=1.7. To install run:

$ pip install -r requirements.txt

Tutorials

Environments

YOLOv3 may be run in any of the following up-to-date verified environments (with all dependencies including CUDA/CUDNN, Python and PyTorch preinstalled):

Inference

detect.py runs inference on a variety of sources, downloading models automatically from the latest YOLOv3 release and saving results to runs/detect.

$ python detect.py --source 0  # webcam
                            file.jpg  # image 
                            file.mp4  # video
                            path/  # directory
                            path/*.jpg  # glob
                            'https://youtu.be/NUsoVlDFqZg'  # YouTube video
                            'rtsp://example.com/media.mp4'  # RTSP, RTMP, HTTP stream

To run inference on example images in data/images:

$ python detect.py --source data/images --weights yolov3.pt --conf 0.25

PyTorch Hub

To run batched inference with YOLOv3 and PyTorch Hub:

import torch

# Model
model = torch.hub.load('ultralytics/yolov3', 'yolov3')  # or 'yolov3_spp', 'yolov3_tiny'
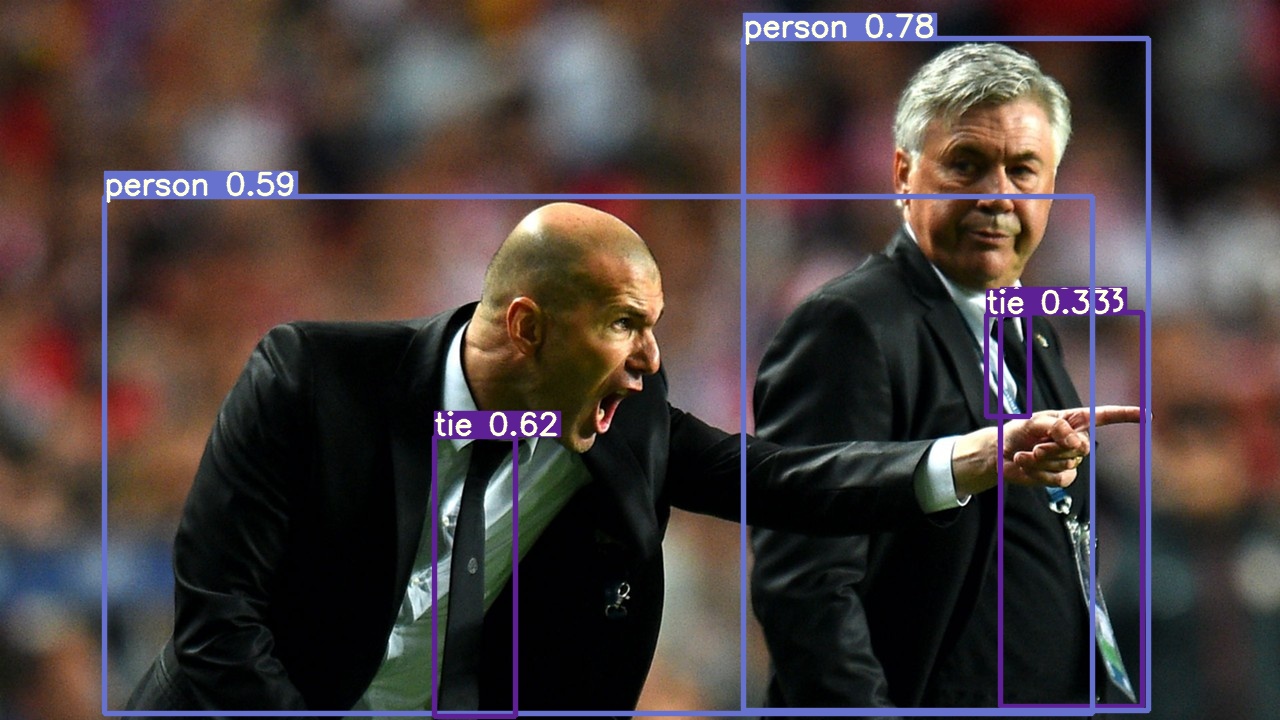
# Image
img = 'https://ultralytics.com/images/zidane.jpg'

# Inference
results = model(img)
results.print()  # or .show(), .save()

Training

Run commands below to reproduce results on COCO dataset (dataset auto-downloads on first use). Training times for YOLOv3/YOLOv3-SPP/YOLOv3-tiny are 6/6/2 days on a single V100 (multi-GPU times faster). Use the largest --batch-size your GPU allows (batch sizes shown for 16 GB devices).

$ python train.py --data coco.yaml --cfg yolov3.yaml      --weights '' --batch-size 24
                                         yolov3-spp.yaml                            24
                                         yolov3-tiny.yaml                           64

Citation

DOI

About Us

Ultralytics is a U.S.-based particle physics and AI startup with over 6 years of expertise supporting government, academic and business clients. We offer a wide range of vision AI services, spanning from simple expert advice up to delivery of fully customized, end-to-end production solutions, including:

  • Cloud-based AI systems operating on hundreds of HD video streams in realtime.
  • Edge AI integrated into custom iOS and Android apps for realtime 30 FPS video inference.
  • Custom data training, hyperparameter evolution, and model exportation to any destination.

For business inquiries and professional support requests please visit us at https://ultralytics.com.

Contact

Issues should be raised directly in the repository. For business inquiries or professional support requests please visit https://ultralytics.com or email Glenn Jocher at [email protected].

Comments
  • CUSTOM TRAINING EXAMPLE (OLD)

    CUSTOM TRAINING EXAMPLE (OLD)

    This guide explains how to train your own custom dataset with YOLOv3.

    Before You Start

    Clone this repo, download COCO dataset, and install requirements.txt dependencies, including Python>=3.7 and PyTorch>=1.4.

    git clone https://github.com/ultralytics/yolov3
    bash yolov3/data/get_coco2017.sh  # 19GB
    cd yolov3
    pip install -U -r requirements.txt
    

    Train On Custom Data

    1. Label your data in Darknet format. After using a tool like Labelbox to label your images, you'll need to export your data to darknet format. Your data should follow the example created by get_coco2017.sh, with images and labels in separate parallel folders, and one label file per image (if no objects in image, no label file is required). The label file specifications are:

    • One row per object
    • Each row is class x_center y_center width height format.
    • Box coordinates must be in normalized xywh format (from 0 - 1). If your boxes are in pixels, divide x_center and width by image width, and y_center and height by image height.
    • Class numbers are zero-indexed (start from 0).

    Each image's label file must be locatable by simply replacing /images/*.jpg with /labels/*.txt in its pathname. An example image and label pair would be:

    ../coco/images/train2017/000000109622.jpg  # image
    ../coco/labels/train2017/000000109622.txt  # label
    

    An example label file with 5 persons (all class 0):
    Screen Shot 2020-04-01 at 11 44 26 AM

    2. Create train and test *.txt files. Here we create data/coco16.txt, which contains the first 16 images of the COCO2017 dataset. We will use this small dataset for both training and testing. Each row contains a path to an image, and remember one label must also exist in a corresponding /labels folder for each image containing objects.
    Screen Shot 2020-04-01 at 11 47 28 AM

    3. Create new *.names file listing the class names in our dataset. Here we use the existing data/coco.names file. Classes are zero indexed, so person is class 0, bicycle is class 1, etc.
    Screenshot 2019-04-06 at 14 06 34

    4. Create new *.data file with your class count (COCO has 80 classes), paths to train and validation datasets (we use the same images twice here, but in practice you'll want to validate your results on a separate set of images), and with the path to your *.names file. Save as data/coco16.data. Screen Shot 2020-04-01 at 11 48 41 AM

    5. Update yolov3-spp.cfg (optional). By default each YOLO layer has 255 outputs: 85 values per anchor [4 box coordinates + 1 object confidence + 80 class confidences], times 3 anchors. Update the settings to filters=[5 + n] * 3 and classes=n, where n is your class count. This modification should be made in all 3 YOLO layers. Screen Shot 2020-04-02 at 12 37 31 PM

    6. (OPTIONAL) Update hyperparameters such as LR, LR scheduler, optimizer, augmentation settings, multi_scale settings, etc in train.py for your particular task. If in doubt about these settings, we recommend you start with all-default settings before changing anything.

    7. Train. Run python3 train.py --cfg yolov3-spp.cfg --data data/coco16.data --nosave to train using your custom *.data and *.cfg. By default pretrained --weights yolov3-spp-ultralytics.pt is used to initialize your model. You can instead train from scratch with --weights '', or from any other weights or backbone of your choice, as long as it corresponds to your *.cfg.

    Visualize Results

    Run from utils import utils; utils.plot_results() to see your training losses and performance metrics vs epoch. If you don't see acceptable performance, try hyperparameter tuning and re-training. Multiple results.txt files are overlaid automatically to compare performance.

    Here we see training results from data/coco64.data starting from scratch, a darknet53 backbone, and our yolov3-spp-ultralytics.pt pretrained weights.

    download

    Run inference with your trained model by copying an image to data/samples folder and running
    python3 detect.py --weights weights/last.pt coco_val2014_000000001464

    Reproduce Our Results

    To reproduce this tutorial, simply run the following code. This trains all the various tutorials, saves each results*.txt file separately, and plots them together as results.png. It all takes less than 30 minutes on a 2080Ti.

    git clone https://github.com/ultralytics/yolov3
    python3 -c "from yolov3.utils.google_utils import gdrive_download; gdrive_download('1h0Id-7GUyuAmyc9Pwo2c3IZ17uExPvOA','coco2017demos.zip')"  # datasets (20 Mb)
    cd yolov3
    python3 train.py --data coco64.data --batch 16 --epochs 300 --nosave --cache --weights '' --name from_scratch
    python3 train.py --data coco64.data --batch 16 --epochs 300 --nosave --cache --weights yolov3-spp-ultralytics.pt --name from_yolov3-spp-ultralytics
    python3 train.py --data coco64.data --batch 16 --epochs 300 --nosave --cache --weights darknet53.conv.74 --name from_darknet53.conv.74
    python3 train.py --data coco1.data --batch 1 --epochs 300 --nosave --cache --weights darknet53.conv.74 --name 1img
    python3 train.py --data coco1cls.data --batch 16 --epochs 300 --nosave --cache --weights darknet53.conv.74 --cfg yolov3-spp-1cls.cfg --name 1cls
    

    Reproduce Our Environment

    To access an up-to-date working environment (with all dependencies including CUDA/CUDNN, Python and PyTorch preinstalled), consider a:

    tutorial Stale 
    opened by glenn-jocher 169
  • Train YOLOv3-SPP from scratch to 62.6 mAP@0.5

    Train YOLOv3-SPP from scratch to 62.6 [email protected]

    Hi, Thanks for sharing your work ! I would like what is your configuration for the training of yolov3.cfg to get 55% MAP ? We tried 100 epochs but we got a MAP (35%) who don't really change much more. And the test loss start diverge a little. Why you give a very high loss gain for the confidence loss ? Thanks in advance for your reply. results

    Stale 
    opened by Aurora33 151
  • CSPResNeXt50-PANet-SPP

    CSPResNeXt50-PANet-SPP

    Does this repo. support CSPResNeXt50-PANet-SPP? (https://github.com/WongKinYiu/CrossStagePartialNetworks/)

    AlexeyABs support: https://github.com/AlexeyAB/darknet/issues/4406

    My tests have found it to be a clear winner over yolov3-spp in terms of mAP and speed.

    enhancement Stale 
    opened by LukeAI 109
  • HYPERPARAMETER EVOLUTION

    HYPERPARAMETER EVOLUTION

    Training hyperparameters in this repo are defined in train.py, including augmentation settings: https://github.com/ultralytics/yolov3/blob/df4f25e610bc31af3ba458dce4e569bb49174745/train.py#L35-L54

    We began with darknet defaults before evolving the values using the result of our hyp evolution code:

    python3 train.py --data data/coco.data --weights '' --img-size 320 --epochs 1 --batch-size 64 -- accumulate 1 --evolve
    

    The process is simple: for each new generation, the prior generation with the highest fitness (out of all previous generations) is selected for mutation. All parameters are mutated simultaneously based on a normal distribution with about 20% 1-sigma: https://github.com/ultralytics/yolov3/blob/df4f25e610bc31af3ba458dce4e569bb49174745/train.py#L390-L396

    Fitness is defined as a weighted mAP and F1 combination at the end of epoch 0, under the assumption that better epoch 0 results correlate to better final results, which may or may not be true. https://github.com/ultralytics/yolov3/blob/bd924576048af29de0a48d4bb55bbe24e09537a6/utils/utils.py#L605-L608

    An example snapshot of the results are here. Fitness is on the y axis (higher is better). from utils.utils import *; plot_evolution_results(hyp) evolve

    enhancement tutorial 
    opened by glenn-jocher 106
  • TRANSFER LEARNING EXAMPLE

    TRANSFER LEARNING EXAMPLE

    This guide explains how to train your data with YOLOv3 using Transfer Learning. Transfer learning can be a useful way to quickly retrain YOLOv3 on new data without needing to retrain the entire network. We accomplish this by starting from the official YOLOv3 weights, and setting each layer's .requires_grad field to false that we do not want to calculate gradients for and optimize.

    Before You Start

    1. Update (Python >= 3.7, PyTorch >= 1.3, etc.) and install requirements.txt dependencies.
    2. Clone repo: git clone https://github.com/ultralytics/yolov3
    3. Download COCO: bash yolov3/data/get_coco2017.sh

    Transfer Learning

    1. Download pretrained weights from our Google Drive folder that you want to use to transfer learn, and place them in yolov3/weights/.

    2. Update *.cfg file (optional). Each YOLO layer has 255 outputs: 85 outputs per anchor [4 box coordinates + 1 object confidence + 80 class confidences], times 3 anchors. If you use fewer classes, reduce filters to filters=[4 + 1 + n] * 3, where n is your class count. This modification should be made to the layer preceding each of the 3 YOLO layers. Also modify classes=80 to classes=n in each YOLO layer, where n is your class count.
    screenshot 2019-02-21 at 19 40 01

    3. Train.

    python3 train.py --data coco1cls.data --cfg yolov3-spp-1cls.cfg --weights weights/yolov3-spp.pt --transfer
    

    Run the above code to transfer learn on COCO, or specify your own data as --data data/custom.data (See https://github.com/ultralytics/yolov3/wiki/Train-Custom-Data).

    If you created a custom *.cfg file, specify it as --cfg custom.cfg.

    You can observe in the Model Summary (using model_info(model, report='full') in train.py) that only the 3 YOLO layers have their gradients activated now (all other layers are frozen for duration of training):

    Screenshot 2019-09-12 at 12 25 22

    Reproduce Our Environment

    To access an up-to-date working environment (with all dependencies including CUDA/CUDNN, Python and PyTorch preinstalled), consider a:

    tutorial Stale 
    opened by glenn-jocher 80
  • SINGLE-CLASS TRAINING EXAMPLE

    SINGLE-CLASS TRAINING EXAMPLE

    This guide explains how to train your own single-class dataset with YOLOv3.

    Before You Start

    1. Update (Python >= 3.7, PyTorch >= 1.3, etc.) and install requirements.txt dependencies.
    2. Clone repo: git clone https://github.com/ultralytics/yolov3
    3. Download COCO: bash yolov3/data/get_coco2017.sh

    Train On Custom Data

    1. Label your data in Darknet format. After using a tool like Labelbox to label your images, you'll need to export your data to darknet format. Your data should follow the example created by get_coco2017.sh, with images and labels in separate parallel folders, and one label file per image (if no objects in image, no label file is required). The label file specifications are:

    • One row per object
    • Each row is class x_center y_center width height format.
    • Box coordinates must be in normalized xywh format (from 0 - 1). If your boxes are in pixels, divide x_center and width by image width, and y_center and height by image height.
    • Class numbers are zero-indexed (start from 0).

    Each image's label file must be locatable by simply replacing /images/*.jpg with /labels/*.txt in its pathname. An example image and label pair would be:

    ../coco/images/train2017/000000109622.jpg  # image
    ../coco/labels/train2017/000000109622.txt  # label
    

    An example label file with 4 persons (all class 0):
    screenshot 2019-02-20 at 17 05 23

    2. Create train and test *.txt files. Here we create data/coco_1cls.txt, which contains 5 images with only persons from the coco 2014 trainval dataset. We will use this small dataset for both training and testing. Each row contains a path to an image, and remember one label must also exist in a corresponding /labels folder for each image that has targets.
    Screenshot 2019-04-07 at 13 50 06

    3. Create new *.names file listing all of the names for the classes in our dataset. Here we use the existing data/coco.names file. Classes are zero indexed, so person is class 0. screenshot 2019-02-20 at 16 50 30

    4. Update data/coco.data lines 2 and 3 to point to our new text file for training and validation (in your own data you would likely want to use separate train and test sets). Also update line 1 to our new class count, if not 80, and lastly update line 4 to point to our new *.names file, if you created one. Save the modified file as data/coco_1cls.data.
    Screenshot 2019-04-07 at 13 48 48

    5. Update *.cfg file (optional). Each YOLO layer has 255 outputs: 85 outputs per anchor [4 box coordinates + 1 object confidence + 80 class confidences], times 3 anchors. If you use fewer classes, reduce filters to filters=[4 + 1 + n] * 3, where n is your class count. This modification should be made to the layer preceding each of the 3 YOLO layers. Also modify classes=80 to classes=n in each YOLO layer, where n is your class count (for single class training, n=1). screenshot 2019-02-21 at 19 40 01

    6. (OPTIONAL) Update hyperparameters such as LR, LR scheduler, optimizer, augmentation settings, multi_scale settings, etc in train.py for your particular task. We recommend you start with all-default settings first updating anything.

    7. Train. Run python3 train.py --data data/coco_1cls.data to train using your custom data. If you created a custom *.cfg file as well, specify it using --cfg cfg/my_new_file.cfg.

    Visualize Results

    Run from utils import utils; utils.plot_results() to see your training losses and performance metrics vs epoch. If you don't see acceptable performance, try hyperparameter tuning and re-training. Multiple results.txt files are overlaid automatically to compare performance.

    Here we see results from training on coco_1cls.data using the default yolov3-spp.cfg and also a single-class yolov3-spp-1cls.cfg, available in the data/ and cfg/ folders.

    results (2)

    Evaluate your trained model: copy COCO_val2014_000000001464.jpg to data/samples folder and run python3 detect.py --weights weights/last.pt coco_val2014_000000001464

    Reproduce Our Results

    To reproduce this tutorial, simply run the following code. This trains all the various tutorials, saves each results*.txt file separately, and plots them together as results.png. It all takes less than 30 minutes on a 2080Ti.

    git clone https://github.com/ultralytics/yolov3
    python3 -c "from yolov3.utils.google_utils import gdrive_download; gdrive_download('1h0Id-7GUyuAmyc9Pwo2c3IZ17uExPvOA','coco2017demos.zip')"  # datasets (20 Mb)
    cd yolov3
    python3 train.py --data coco64.data --batch 16 --accum 1 --epochs 300 --nosave --cache --weights '' --name from_scratch
    python3 train.py --data coco64.data --batch 16 --accum 1 --epochs 300 --nosave --cache --weights yolov3-spp-ultralytics.pt --name from_yolov3-spp-ultralytics
    python3 train.py --data coco64.data --batch 16 --accum 1 --epochs 300 --nosave --cache --weights darknet53.conv.74 --name from_darknet53.conv.74
    python3 train.py --data coco1.data --batch 1 --accum 1 --epochs 300 --nosave --cache --weights darknet53.conv.74 --name 1img
    python3 train.py --data coco1cls.data --batch 16 --accum 1 --epochs 300 --nosave --cache --weights darknet53.conv.74 --cfg yolov3-spp-1cls.cfg --name 1cls
    

    Reproduce Our Environment

    To access an up-to-date working environment (with all dependencies including CUDA/CUDNN, Python and PyTorch preinstalled), consider a:

    tutorial Stale 
    opened by glenn-jocher 72
  • Target classes exceed model classes

    Target classes exceed model classes

    Created custom files for training: (4 + 1 + 13) * 3 = 54 13 classes, 54 filters

    *.names has 13 names in it *.cfg was converted properly w 13 for classes, 54 for filters in all 3 yolo blocks

    yolov3/utils/utils.py", line 451, in build_targets assert c.max() <= model.nc, 'Target classes exceed model classes' AssertionError: Target classes exceed model classes

    bug 
    opened by salinaaaaaa 64
  • KeyError: 'module_list.85.Conv2d.weight'

    KeyError: 'module_list.85.Conv2d.weight'

    Hey I get a new error whan I run the train script:

    Downloading https://drive.google.com/uc?export=download&id=158g62Vs14E3aj7oPVPuEnNZMKFNgGyNq as weights/ultralytics49.pt... Done (2.8s)
    Traceback (most recent call last):
      File "train.py", line 444, in <module>
        train()  # train normally
      File "train.py", line 111, in train
        chkpt['model'] = {k: v for k, v in chkpt['model'].items() if model.state_dict()[k].numel() == v.numel()}
      File "train.py", line 111, in <dictcomp>
        chkpt['model'] = {k: v for k, v in chkpt['model'].items() if model.state_dict()[k].numel() == v.numel()}
    KeyError: 'module_list.85.Conv2d.weight'
    
    bug 
    opened by alontrais 60
  • LEARNING RATE SCHEDULER

    LEARNING RATE SCHEDULER

    The original darknet learning rate (LR) scheduler parameters are set in a model's *.cfg file:

    • learning_rate: initial LR
    • burn_in: number of batches to ramp LR from 0 to learning_rate in epoch 0
    • max_batches: the number of batches to train the model to
    • policy: type of LR scheduler
    • steps: batch numbers at which LR is reduced
    • scales: LR multiple applied at steps (gamma in PyTorch)
    Screenshot 2019-04-24 at 12 38 18

    In this repo LR scheduling is set in train.py. We set the initial and final LRs as hyperparameters hyp['lr0'] and hyp['lrf'], where the final LR = lr0 * (10 ** lrf) . For example, if the initial LR is 0.001 and the final LR is 100 times (1e-2) smaller, hyp['lrf']=0.001 and hyp['lrf']=-2. This plot shows two of the available PyTorch LR schedulers, with the MultiStepLR scheduler following the original darknet implementation (at batch_size=64 on COCO). To learn more please visit: https://pytorch.org/docs/stable/optim.html#how-to-adjust-learning-rate

    LR

    The LR hyperparameters are tunable, along with all the rest of the model hyperparmeters in train.py:

    https://github.com/ultralytics/yolov3/blob/1771ffb1cf293ef176ac6ef2ddb7af7ca672c0e7/train.py#L13-L25

    Actual LR scheduling is set further down in train.py, and has been tuned for COCO training. You may want to set your own scheduler according to your specific custom dataset and training requirements, and also adjust it's hyperparameters accordingly. https://github.com/ultralytics/yolov3/blob/bd2378fad1578e7d7722ad846458ad7a2bb43442/train.py#L102-L109

    question tutorial Stale 
    opened by glenn-jocher 55
  • Resume training from official yolov3 weights

    Resume training from official yolov3 weights

    Thanks for your improvement of this YOLOv3 implementation. I have just test the training ,got some problem . I follow these steps.

    1. load the original yolov3.weight to the model
    2. train it on coco2014 with your train.py. 3.Got the following logs ,the precision is down fast from 0.5->0.1. but recall is up to 0.35. see Screenshot here log

    4.I save the weight with precision0.2, and run the detect.py the result like this , 000000000019 
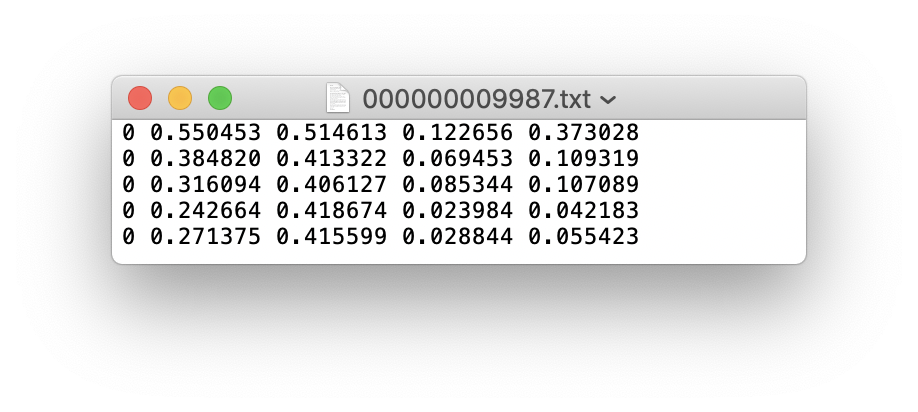
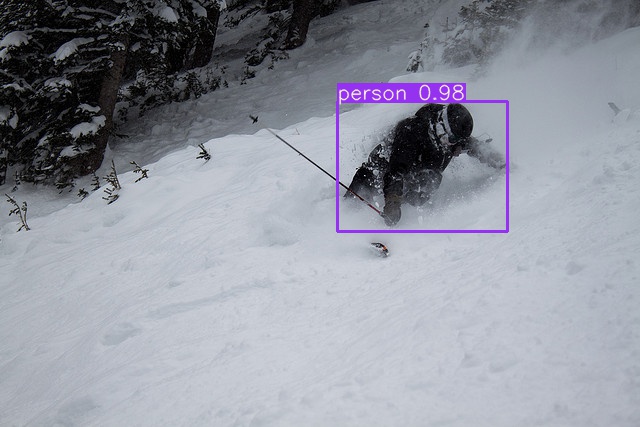
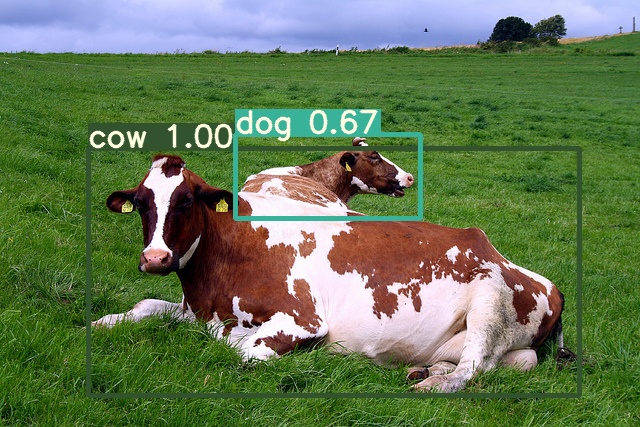
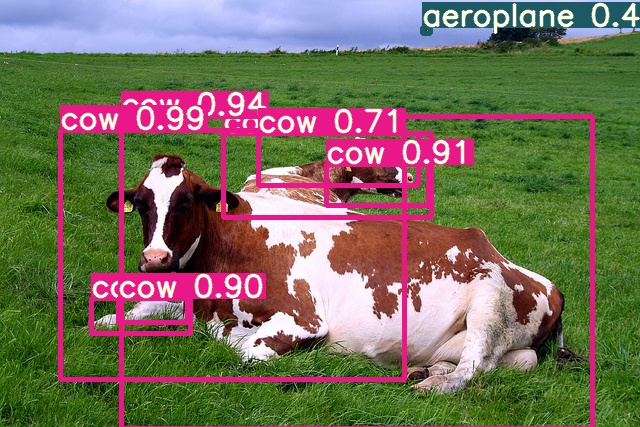
if I do not train,the orginal wight can get this result: 000000000019

    I do not know whether I used wrong parameters or something else, lead to generation of many bbox . could you give me some suggestion? Thank you~

    bug help wanted 
    opened by lianuo 54
  • Gray Images

    Gray Images

    Dear all,

    Apparently it is not possible to train the model with gray images.

    Even if I convert the images in the getitem function, then the code will explode due to the multiple dependencies on the channel. E.g

        bs, _, h, w = imgs.shape  # batch size, _, height, width


    Cheers,

    Francesco Saverio

    enhancement Stale 
    opened by FrancescoSaverioZuppichini 45
  • Bump cirrus-actions/rebase from 1.7 to 1.8

    Bump cirrus-actions/rebase from 1.7 to 1.8

    Bumps cirrus-actions/rebase from 1.7 to 1.8.

    Release notes

    Sourced from cirrus-actions/rebase's releases.

    1.8

    What's Changed

    New Contributors

    Full Changelog: https://github.com/cirrus-actions/rebase/compare/1.7...1.8

    Commits

    Dependabot compatibility score

    Dependabot will resolve any conflicts with this PR as long as you don't alter it yourself. You can also trigger a rebase manually by commenting @dependabot rebase.


    Dependabot commands and options

    You can trigger Dependabot actions by commenting on this PR:

    • @dependabot rebase will rebase this PR
    • @dependabot recreate will recreate this PR, overwriting any edits that have been made to it
    • @dependabot merge will merge this PR after your CI passes on it
    • @dependabot squash and merge will squash and merge this PR after your CI passes on it
    • @dependabot cancel merge will cancel a previously requested merge and block automerging
    • @dependabot reopen will reopen this PR if it is closed
    • @dependabot close will close this PR and stop Dependabot recreating it. You can achieve the same result by closing it manually
    • @dependabot ignore this major version will close this PR and stop Dependabot creating any more for this major version (unless you reopen the PR or upgrade to it yourself)
    • @dependabot ignore this minor version will close this PR and stop Dependabot creating any more for this minor version (unless you reopen the PR or upgrade to it yourself)
    • @dependabot ignore this dependency will close this PR and stop Dependabot creating any more for this dependency (unless you reopen the PR or upgrade to it yourself)
    dependencies 
    opened by dependabot[bot] 0
  • docker container python environment not working

    docker container python environment not working

    Search before asking

    • [X] I have searched the YOLOv3 issues and found no similar bug report.

    YOLOv3 Component

    No response

    Bug

    The docker image appears to not have a functioning python environment.

    Environment

    ultralytics/yolov3 docker container

    Minimal Reproducible Example

    I start by running the image in interactive mode: docker run --ipc=host -it --gpus all ultralytics/yolov3:latest Now run the training script: python train.py gives the following output:

    Traceback (most recent call last):
      File "train.py", line 34, in <module>
        import val  # for end-of-epoch mAP
      File "/usr/src/app/val.py", line 26, in <module>
        from models.common import DetectMultiBackend
      File "/usr/src/app/models/common.py", line 13, in <module>
        import cv2
      File "/opt/conda/lib/python3.8/site-packages/cv2/__init__.py", line 181, in <module>
        bootstrap()
      File "/opt/conda/lib/python3.8/site-packages/cv2/__init__.py", line 175, in bootstrap
        if __load_extra_py_code_for_module("cv2", submodule, DEBUG):
      File "/opt/conda/lib/python3.8/site-packages/cv2/__init__.py", line 28, in __load_extra_py_code_for_module
        py_module = importlib.import_module(module_name)
      File "/opt/conda/lib/python3.8/importlib/__init__.py", line 127, in import_module
        return _bootstrap._gcd_import(name[level:], package, level)
      File "/opt/conda/lib/python3.8/site-packages/cv2/mat_wrapper/__init__.py", line 33, in <module>
        cv._registerMatType(Mat)
    AttributeError: partially initialized module 'cv2' has no attribute '_registerMatType' (most likely due to a circular import)
    

    Additional

    No response

    Are you willing to submit a PR?

    • [ ] Yes I'd like to help by submitting a PR!
    bug 
    opened by JasonJooste 3
  • how to load  pretrained weights  on custom data?

    how to load pretrained weights on custom data?

    Search before asking

    • [X] I have searched the YOLOv3 issues and discussions and found no similar questions.

    Question

    waiting for your kindness help!!!

    I load pretrained yolov3 model from torch hub, like below:

    model = torch.hub.load('ultralytics/yolov3', 'yolov3')

    And I trained the model on my custom data, I really got the best.pt and last.pt weights file in the folder of runs/train/exp60/weights. However, when I try to load the model use my own weights files, there is something wrong. My code like this:

    import torch from models import yolo

    model = yolo.Model(cfg="models/yolov3.yaml",ch=3, nc=1).to("cpu") weights_path = r"F:\DeepLearning\yolov3-master\yolov3-master\runs\train\exp60\weights\best.pt" checkpcoint = torch.load(weights_path) model.load_state_dict(checkpoint["model"], strict=False) model.eval()

    The error informations:

    Traceback (most recent call last): File "f:/DeepLearning/yolov3-master/yolov3-master/peppertest.py", line 22, in model.load_state_dict(checkpoint["model"], strict=False) File "D:\anaconda3\lib\site-packages\torch\nn\modules\module.py", line 1379, in load_state_dict state_dict = state_dict.copy() File "D:\anaconda3\lib\site-packages\torch\nn\modules\module.py", line 1130, in getattr raise AttributeError("'{}' object has no attribute '{}'".format( AttributeError: 'Model' object has no attribute 'copy'

    Additional

    No response

    question 
    opened by ayingxp 3
  • YOLOV4 TRAINING

    YOLOV4 TRAINING

    Search before asking

    • [X] I have searched the YOLOv3 issues and discussions and found no similar questions.

    Question

    How can i train yolov4 in this repo sir @glenn-jocher ? I'm new to this field and i need some steps to start transfer learning my data using yolov4 under this repo since i've found some issues that this repo can train yolov4. Can I still do that? How?

    Additional

    No response

    question 
    opened by simplecoderx 2
  • 该项目 是否 不在  支持YOLO4了

    该项目 是否 不在 支持YOLO4了

    Search before asking

    • [X] I have searched the YOLOv3 issues and discussions and found no similar questions.

    Question

    新的 YOLO4 权重 转换不了 项目提供的CFG 文件 yolo4 darkne 下也无法训练

    Additional

    No response

    question 
    opened by z13228604287 1
  • use detect.py of archive branch meet errors:  ModuleNotFoundError: No module named 'models.yolo'; 'models' is not a package

    use detect.py of archive branch meet errors: ModuleNotFoundError: No module named 'models.yolo'; 'models' is not a package

    Search before asking

    • [X] I have searched the YOLOv3 issues and found no similar bug report.

    YOLOv3 Component

    Detection

    Bug

    1. Hello,I would like to ask you some questions.Today ,when i used the detect.py of archive branch,i met some errors(the same way used in branch of master is well ):

    [email protected]:~/yolov3$ python3 detect.py Namespace(agnostic_nms=False, augment=False, cfg='cfg/yolov3.cfg', classes=None, conf_thres=0.3, device='', fourcc='mp4v', half=False, img_size=512, iou_thres=0.6, names='data/coco.names', output='output', save_txt=False, source='data/samples', view_img=False, weights='weights/yolov3.pt') Using CUDA device0 _CudaDeviceProperties(name='NVIDIA Tegra X2', total_memory=3832MB)

    /home/jetson/.local/lib/python3.6/site-packages/torch/functional.py:445: UserWarning: torch.meshgrid: in an upcoming release, it will be required to pass the indexing argument. (Triggered internally at /media/nvidia/NVME/pytorch/pytorch-v1.10.0/aten/src/ATen/native/TensorShape.cpp:2157.) return _VF.meshgrid(tensors, **kwargs) # type: ignore[attr-defined] Model Summary: 222 layers, 6.19491e+07 parameters, 6.19491e+07 gradients, 117.5 GFLOPS Traceback (most recent call last): File "detect.py", line 191, in detect() File "detect.py", line 25, in detect model.load_state_dict(torch.load(weights, map_location=device)['model']) File "/home/jetson/.local/lib/python3.6/site-packages/torch/serialization.py", line 607, in load return _load(opened_zipfile, map_location, pickle_module, **pickle_load_args) File "/home/jetson/.local/lib/python3.6/site-packages/torch/serialization.py", line 882, in _load result = unpickler.load() File "/home/jetson/.local/lib/python3.6/site-packages/torch/serialization.py", line 875, in find_class return super().find_class(mod_name, name) ModuleNotFoundError: No module named 'models.yolo'; 'models' is not a package

    Environment

    No response

    Minimal Reproducible Example

    No response

    Additional

    I want to ask some suggestions about how to deploy V3 algorithm on my jetson development board. looking forward to your reply,With best wishes.

    Are you willing to submit a PR?

    • [X] Yes I'd like to help by submitting a PR!
    bug Stale 
    opened by dapiaoGe 3
Releases(v9.6.0)
Owner
Ultralytics
YOLOv5 🚀 and Vision AI ⭐
Ultralytics
A simple editor for captions in .SRT file extension

WaySRT A simple editor for captions in .SRT file extension The program doesn't use any external dependecies, just run: python way_srt.py {file_name.sr

Gustavo Lopes 3 Nov 16, 2022
List of all dependencies affected by node-ipc malicious commit

node-ipc-dependencies-list List of all dependencies affected by node-ipc malicious commit as of 17/3/2022 - 19/3/2022 (timestamp) Please improve upon

99 Oct 15, 2022
CPT: A Pre-Trained Unbalanced Transformer for Both Chinese Language Understanding and Generation

CPT This repository contains code and checkpoints for CPT. CPT: A Pre-Trained Unbalanced Transformer for Both Chinese Language Understanding and Gener

fastNLP 341 Dec 29, 2022
Virtual hand gesture mouse using a webcam

NonMouse 日本語のREADMEはこちら This is an application that allows you to use your hand itself as a mouse. The program uses a web camera to recognize your han

Yuki Takeyama 55 Jan 01, 2023
UNet model with VGG11 encoder pre-trained on Kaggle Carvana dataset

TernausNet: U-Net with VGG11 Encoder Pre-Trained on ImageNet for Image Segmentation By Vladimir Iglovikov and Alexey Shvets Introduction TernausNet is

Vladimir Iglovikov 1k Dec 28, 2022
《Dual-Resolution Correspondence Network》(NeurIPS 2020)

Dual-Resolution Correspondence Network Dual-Resolution Correspondence Network, NeurIPS 2020 Dependency All dependencies are included in asset/dualrcne

Active Vision Laboratory 45 Nov 21, 2022
IJCAI2020 & IJCV 2020 :city_sunrise: Unsupervised Scene Adaptation with Memory Regularization in vivo

Seg_Uncertainty In this repo, we provide the code for the two papers, i.e., MRNet:Unsupervised Scene Adaptation with Memory Regularization in vivo, IJ

Zhedong Zheng 348 Jan 05, 2023
CaLiGraph Ontology as a Challenge for Semantic Reasoners ([email protected]'21)

CaLiGraph for Semantic Reasoning Evaluation Challenge This repository contains code and data to use CaLiGraph as a benchmark dataset in the Semantic R

Nico Heist 0 Jun 08, 2022
Block Sparse movement pruning

Movement Pruning: Adaptive Sparsity by Fine-Tuning Magnitude pruning is a widely used strategy for reducing model size in pure supervised learning; ho

Hugging Face 54 Dec 20, 2022
The final project for "Applying AI to Wearable Device Data" course from "AI for Healthcare" - Udacity.

Motion Compensated Pulse Rate Estimation Overview This project has 2 main parts. Develop a Pulse Rate Algorithm on the given training data. Then Test

Omar Laham 2 Oct 25, 2022
Simple implementation of Mobile-Former on Pytorch

Simple-implementation-of-Mobile-Former At present, only the model but no trained. There may be some bug in the code, and some details may be different

Acheung 103 Dec 31, 2022
T-LOAM: Truncated Least Squares Lidar-only Odometry and Mapping in Real-Time

T-LOAM: Truncated Least Squares Lidar-only Odometry and Mapping in Real-Time The first Lidar-only odometry framework with high performance based on tr

Pengwei Zhou 183 Dec 01, 2022
Baleen: Robust Multi-Hop Reasoning at Scale via Condensed Retrieval (NeurIPS'21)

Baleen Baleen is a state-of-the-art model for multi-hop reasoning, enabling scalable multi-hop search over massive collections for knowledge-intensive

Stanford Future Data Systems 22 Dec 05, 2022
BLEURT is a metric for Natural Language Generation based on transfer learning.

BLEURT: a Transfer Learning-Based Metric for Natural Language Generation BLEURT is an evaluation metric for Natural Language Generation. It takes a pa

Google Research 492 Jan 05, 2023
Voice Gender Recognition

In this project it was used some different Machine Learning models to identify the gender of a voice (Female or Male) based on some specific speech and voice attributes.

Anne Livia 1 Jan 27, 2022
Adversarial Reweighting for Partial Domain Adaptation

Adversarial Reweighting for Partial Domain Adaptation Code for paper "Xiang Gu, Xi Yu, Yan Yang, Jian Sun, Zongben Xu, Adversarial Reweighting for Par

12 Dec 01, 2022
High frequency AI based algorithmic trading module.

Flow Flow is a high frequency algorithmic trading module that uses machine learning to self regulate and self optimize for maximum return. The current

59 Dec 14, 2022
DCSAU-Net: A Deeper and More Compact Split-Attention U-Net for Medical Image Segmentation

DCSAU-Net: A Deeper and More Compact Split-Attention U-Net for Medical Image Segmentation By Qing Xu, Wenting Duan and Na He Requirements pytorch==1.1

Qing Xu 20 Dec 09, 2022
Code accompanying "Learning What To Do by Simulating the Past", ICLR 2021.

Learning What To Do by Simulating the Past This repository contains code that implements the Deep Reward Learning by Simulating the Past (Deep RSLP) a

Center for Human-Compatible AI 24 Aug 07, 2021
Combinatorial model of ligand-receptor binding

Combinatorial model of ligand-receptor binding The binding of ligands to receptors is the starting point for many import signal pathways within a cell

Mobolaji Williams 0 Jan 09, 2022