![]()
N.I.R.E.M.A.
NFC Implant-base RSA Encrypted Messagging application
This project aims to develop an NFC implant-based RSA encrypted messaging application that ensures secure communication between the users and lets the user be the only one who can decrypt the exchanged messages. Besides secure transmission, this application focuses on saving the user private key on an external underskin implant. Thanks to the Mifare DESFire chip’s security, the user can keep out-system the private key used to sign and encrypt the communications. Therefore, the only way to access the messages will be with the possession of the unique implant.
Installation steps on Linux Debian base
- Setup proxmark3 client and firmware
- Installation Server Side
- Installation Client Side
- Start the server
- Start the client
Hardware required
Documentations
- N.I.R.E.M.A. file structure
- Registration
- Login
- Chat GUI
- MIFARE DESfire structure
- Request schema
- Application flow
- Database structure
- Creation of a DESFIRE MIFARE app
- Credit
Proxmark3 client version
ATM this application is not working with the last version of the Iceman proxmark firmware. (There are problems related to the dinanic memory). HERE there is the last tested working version, released 20,2021 (ea80ea2).
The proxmark firmware and client should be matching every time. But as I have tested the firmware of the 4-11-2021 with the client of the 20-5-2021, I can confirm that it is working for this occasion. ( I am explain that so if you have a proxmark3 with the last firmware you do not need to reflash it with an old one.)
Installation Server Side (Linux Debian base)
- cloning the repo
git clone https://github.com/Kaosxx88/NFC-Implant-base-RSA-Encrypted-Messaging-Application.git
- cd in the folder
cd NFC-Implant-base-RSA-Encrypted-Messaging-Application.git
- python 3.7+
sudo apt-get install python3
- pip3
sudo apt-get install python3-pip
- Requirements Installation
python3 -m pip install -r requirements.txt
Installation Client Side (Linux Debian base)
- cloning the repo
git clone https://github.com/Kaosxx88/NFC-Implant-base-RSA-Encrypted-Messaging-Application.git
- cd in the folder
cd NFC-Implant-base-RSA-Encrypted-Messaging-Application.git
- python 3.7+
sudo apt-get install python3
- pyqt5
sudo apt-get install python3-pyqt5
- install python3 pip
sudo apt-get install python3-pip
- Requirements Installation
python3 -m pip install -r requirements.txt
IMPORTANT
The file 'pmx3_read_keys_from_desfire.py' in the client folder of the repo, need to be modified accordly. In line 22 the variable self.pm3_path must be change to the user path where the proxmark client have been dowloaded.
Kali linux ONLY
(Setting up a virtual environment top avoid conflict with the python3 modules "serial" / "pyserial" )
- installation of virtual environment
sudo apt-get install python3-venv
- creation virtual environment
python3 -m venv path/to/the/folder
- activation of the virtual environment
source /path/to/the/environment/bin/activate
Start the server application
- change directory into the repo
cd /path/to/the/repo
- change directory into the server folder
cd server
- run the file server.py
python3 server.py
Start the client application
- change directory into the repo
cd /path/to/the/repo
- change directory into the server folder
cd client
- run the file ui.controller.py
python3 ui_controller.py
proxmark3

ACR

MIFARE DESfire

N.I.R.E.M.A. file structure


Registration


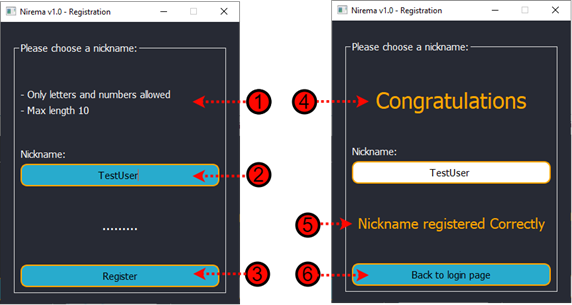
The first and the second button are bringing the user to two different pages, but they are almost the same in graphical. In the following picture, there is a comparison of them. On the left one, the user has to choose the path to save the keys, and on the right one, the user has to select the path from where to load the keys.
Login

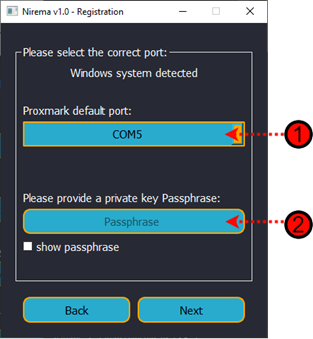
The first screen of the Nirema application is the log in one. There are many elements; let’s take a look at all of them one by one. Points 1 and 2 are the user nickname and the private key passphrase input; the 3 and 4 are the tabs selection for the upload method of the keys. The NFC tab allows the user to load the keys by scanning the MIFARE DESFire chip. On the other side, the File tab, let the user search for the keys in the system directory (There will be another screenshot explaining this part). Point 5 show the available COM port connected to the system. This is the port where the Proxmark or any other card reader will be connected. Point 6 is the login button, and point 7 redirect the user to the registration screen.

Chat GUI

- Application logo
- Name and version of the application.
- Logged user nickname.
- Entry to search for new users
- Button to send the request to the server to search the new user.
- Label that shows an intro message to the user with instruction
- Instruction label

- The top chat label will show the selected chat user destination.
- The delete button, delete all the conversation with the user from the server.
- The search button, search in the chat any corresponding text.
- The message entry allows the user to write the message.
- The left user list shows all the linked user and conversation in the account
- The send button sends the message and clears the message entry.
- The Chatbox will display the conversation.
- The clear button will clear the message entry box.

- New message notification
- New user on the user list
MIFARE DESfire structure
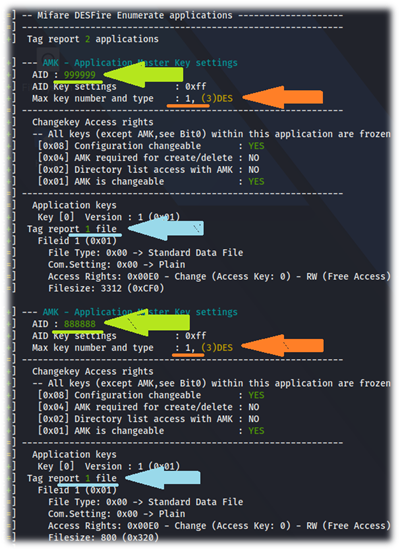
The MIFARE DESFire chip can store up to 28 different applications; each application can have up to 32 files between standards, backup, value file, record file and cycling recording file. Each Desfire chip has a card master key, and each application on it have a maximum of 14 different keys that can be assigned to write, read and delete data in the chip (NXP, 2015). For the realisation of this project, two applications have been written to the DESFire cards. The first one with the Application ID number 0x888888 has been assigned to the public key, and the second application with the AID 0x999999 has been allocated to the encrypted private key. The picture on the left side shows the enumeration of the Desfire chip using the proxmark3 easy. It is possible to notice the two applications written on the chip ( Green arrow). Each of them has one file with the keys inside ( Blue arrow). The files have free read permission but need a predefined key to be written on the card to avoid any unauthorised alteration (Orange arrow). All the keys and the linked authorisation are customisable on the application and file creation. When read from the smart card reader, the internal structure of the MIFARE DESFire chip will be displayed as in the following picture. Please keep in mind that the next image only shows part of the saved private key.

Requests schema
The server side of the Nirema application is in charge of handling the requests and the connections coming from the clients. The servers configuration allows it to accept only specific requests and reject the not recognised or unauthorised ones. The following schema shows the requests of the server.

As is possible to notice in the above picture, all the requests and responses are encrypted apart for the public key request. It is essential to keep in mind that the server uses SSL/TLS certificates. Therefore even if the public key request is not encrypted directly, it is encrypted at the socket level. The symbol (PK) on the above schema’s encryption section means that the communication is encrypted using the counterpart public key and signed using the sender’s private key. Using this encryption method, the recipient of the request/response is sure of the authenticity and the confidentiality of the content. The symbol (RSA) means that the communication is encrypted using RSA at a 256-bit algorithm based on a shared secret key.

Analysing the above request, the utmost level is the SSL/TLS certificate, which protects its content. At the current moment, the server uses a self-signed certificate, but on the day of the Nirema lunch, it will be necessary to buy a certificate for the domain. The second level is the RSA 256 bit encryption. This encryption is based on a secret exchanged between the server and the client on the public key request. Inside the kernel of the request, there are five elements. The first one is the nickname of the recipient of the message. It is needed for the server to redirect the message to the correct user. Therefore the server needs to be able to read this information. The other four elements are not being decrypted from the server because the server does not have the private key to do it. The only way to decrypt the encrypted messages is to be in possession of the sender or recipient private key. Talking about the last four elements looks like they are present twice on the request. It is accurate, but for a reason. For the sender of a message to be able to download the conversation from the server in the future and do not keep the conversation decrypted locally, it is needed to keep on the server a copy of the message that he can read and decrypted. In the case that only the version of the message that is destinated to a recipient is kept on the server, the sender will not be able to decrypt it anymore because only the recipient’s private keys can do it.
Application flow

The above picture shows the concept flow of the N.I.R.E.M.A. application. The utilisation of the local public key database and the (public) public key database NEED TO BE IMPLEMENTED as 2FA and 3FA.
Database structure

The above image show the structure of the server database in which the message are stored. The structure is former of:
- Message number
- Sender Nickname
- Recipient Nickname
- Message encrypted with the sender public key
- Message sign
- Message encrypted with the recipient publick key
- Message sign
Creation of a DESFIRE MIFARE apps
(WORK IN PROGRESS)
Colors and logos

The color palette has been inspirated from Kali Linux theme design ( 2020.1). The following N.I.R.E.M.A. logos are available on the client side folder.

Credits
A big thanks go to Fausto Fasan for the N.I.R.E.M.A. application logos

 2 Nov 22, 2022
 24 Dec 19, 2022
 109 Dec 28, 2022
 35 Dec 25, 2022
 39 Dec 10, 2022
 9 Mar 05, 2022
 53 Nov 01, 2022
 14 Sep 30, 2022
 33 Jan 04, 2023
 1 Aug 02, 2022
 2 Oct 18, 2022
 16 Dec 08, 2022
 5 Aug 09, 2022
 117 Dec 30, 2022
 9 Oct 30, 2022
 19 Nov 15, 2022
 247 Jan 02, 2023
 2 Aug 21, 2022
 171 Dec 25, 2022
 3 Mar 29, 2022