Raspberry Pi Pico as a Rubber Ducky

Overview

Raspberry-Pi-Pico-as-a-Rubber-Ducky

2022-02-09-16-58-32_Trim

Kurulum

  1. Raspberry Pi Pico cihazınız için CircuitPython'u indirin.
  2. Boot düğmesine basılı tutarken cihazı bir USB bağlantı noktasına takın ve cihazı taktıktan sonra boot tuşundan elinizi çekin. Bunun sonucunda "RPI-RP2" adlı çıkarılabilir bir medya aygıtı karşınıza çıkacaktır.
  3. İndirdiğiniz .uf2 dosyasını Pico'nun (RPI-RP2) ana dizinine kopyalayın. Bir süre sonra cihaz yeniden başlayacak ve 1-2 saniye sonra CIRCUITPY adında çıkarılabilir bir medya aygıtı olarak karşınıza çıkacaktır.
  4. Ardından adafruit-circuitpython-bundle-7.x-mpy-YYYYMMDD.zip dosyasını indirin ve cihazın dışına çıkarın.
  5. adafruit-circuitpython-bundle-7.x-mpy-YYYYMMDD klasörü altındaki "lib" klasörüne gidin ve "adafruit_hid'i" Raspberry Pi Pico'nuzdaki lib klasörüne kopyalayın.
  6. Buradaki sayfaya giderek CTRL + S tuşlarına basın ve dosyayı Pico'nun içerisinde bulunan code.py dosyasının üzerine yazarak Raspberry Pi Pico'nun ana dizinine "code.py" olarak kaydedin.
  7. Buradaki linkten bir script bulun veya kendi Rubber Ducky scriptinizi oluşturun ve "payload.dd" olarak kaydedin.
  8. Dikkat edin, son işlemden sonra cihaz yeniden başlatılacak ve yarım saniye sonra komut dosyası (payload.dd) çalışacaktır.

USB Etkinleştirme/Devre Dışı Bırakma

Pico'nun gizlilik amacıyla bir USB depolama aygıtı gibi görünmemesine istiyorsanız;

  1. Cihazı USB bağlantı noktasına takın.
  2. "boot.py" dosyasını Pico'nun (RPI-RP2) ana dizinine kopyalayın.
  3. payload.dd dosyanızı da Pico'ya (RPI-RP2) kopyalayın.
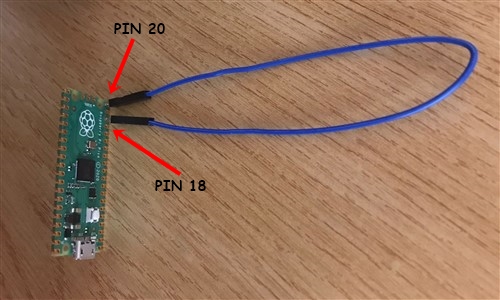
  4. Pico'yu bilgisayarınızdan çıkarın. Pin 18 ve pin 20 arasına bir jumper kablosu bağlayın. Bu durum Pico üzerinde bir kısa devre yaratacaktır ve hedef bilgisayara takıldığında Pico'nun bir USB sürücüsü olarak görünmesini engelleyecek.
  5. Tekrar programlamak için (Payload'ınızı güncellemek için) jumper kabloyu çıkarın ve PC'nize yeniden bağlayın. Varsayılan modda, USB depolama aygıtı aktif durumda olacaktır.

1

Klavye Düzenlerini Değiştirme

Varsayılan modda klavye düzeni İngilizce'dir. Bunu değiştirmek isterseniz;

  1. https://kbdlayout.info/ sayfasından istediğiniz klavye düzenini bularak üzerine tıklayın ve linki kopyalayıp https://www.neradoc.me/layouts/ sayfasındaki kutucuğa yapıştırın. Ardından "Make Zip Bundle Links" butonuna tıklayın.
  2. Ardından "Download the zip file (.py)" butonuna tıklayın.
  3. İndirilen dosyanın içerisinden kendize uygun olan klavye düzeninin dosyalarını Pico'nuzun içerisindeki lib klasörü altına kopyalayın (ben Türkçe Q klavye düzenini tercih ediyorum);
  • keyboard_layout.mpy
  • keyboard_layout_win_tuq.mpy
  • keycode_win_tuq.mpy

2

Dil Dosyanızı Kullanmak için Pico Kodunuzu Değiştirin

Pico içerisindeki "code.py" dosyasını açın ve içerisindeki şu kodu;

from adafruit_hid.keyboard_layout_us import KeyboardLayoutUS as KeyboardLayout
from adafruit_hid.keycode import Keycode

aşağıdaki kod ile değiştirin;

from keyboard_layout_win_tuq import KeyboardLayout
from keycode_win_tuq import Keycode
Owner
Furkan Enes POLATOĞLU
Cyber Security Researcher, SOC Analyst, CENG, YnVsbGV0cHJvb2Y=
Furkan Enes POLATOĞLU
A DiY holiday project to demonstrate how you can send data from adafruitIO cloud to a balena edge device

holiday-star balena ❤️ adafruitIO Introduction A DiY holiday project to demonstrate how you can send data from adafruitIO cloud to a balena edge devic

Ayan Pahwa 3 Dec 20, 2021
A simple non-official manager interface I'm using for my Raspberry Pis.

My Raspberry Pi Manager Overview I have two Raspberry Pi 4 Model B devices that I hooked up to my two TVs (one in my bedroom and the other in my new g

Christian Deacon 21 Jan 04, 2023
ModbusTCP2MQTT - Sungrow & SMA Solar Inverter addon for Home Assistant

ModbusTCP2MQTT Sungrow & SMA Solar Inverter addon for Home Assistant This addon will connect directly to your Inverter using Modbus TCP. Support model

Teny Smart 40 Dec 21, 2022
Automate gate/garage door opening via 433.92MHz emitter with Raspberry Pi, Home Assistant and Homekit.

Automate opening your garage door / gate Summary This project sums up how I automated opening my garage door using a Raspberry PI, a 433Mhz emitter, H

Julien Fouilhé 29 Nov 30, 2022
A flexible data historian based on InfluxDB, Grafana, MQTT and more. Free, open, simple.

Kotori Telemetry data acquisition and sensor networks for humans. Documentation: https://getkotori.org/ Source Code: https://github.com/daq-tools/koto

83 Nov 26, 2022
A LiteX project which builds a SoC with DRAM / HDIM output via the GPDI SYZYGY addon.

ButterStick GPDI LiteX demo A LiteX project which builds a SoC with DRAM / HDIM output via the GPDI SYZYGY addon. Getting started Connect GPDI board t

4 Nov 21, 2021
This OctoPrint plugin will make the initial connection to 3D Hub a breeze

3D Hub Connector This OctoPrint plugin will make the initial connection to 3D Hub a breeze. In future it will help in setting up a tunnel connection a

3D Hub 2 Aug 03, 2022
A script and GUI for controlling stepper motors from an arduino

A script and GUI for controlling stepper motors from an arduino (nema 23 in my case but should work for others in general)

Pip 2 Aug 01, 2022
Imbalaced Classification and Robust Semantic Segmentation

Imbalaced Classification and Robust Semantic Segmentation This repo implements two algoritms. The imbalance clibration (IC) algorithm for image classi

24 Jul 23, 2022
2D waypoints will be predefined in ROS based robots to navigate to the destination avoiding obstacles.

A number of 2D waypoints will be predefined in ROS based robots to navigate to the destination avoiding obstacles.

Arghya Chatterjee 5 Nov 05, 2022
🌱 - WebhookHard◞ Fines Educativos ◟

v1.0.0 WebhookHardware ¿Que es WebhookHardware? WebhookHardware se trata de un proyecto tratado para sacar informacion sobre el hardware de tus victim

3 Jun 14, 2021
This tool emulates an EMV-CAP device, to illustrate the article "Banque en ligne : à la decouverte d'EMV-CAP" published in MISC

About This tool emulates an EMV-CAP device, to illustrate the article "Banque en ligne : à la decouverte d'EMV-CAP" published in MISC, issue #56 and f

Philippe Teuwen 28 Nov 21, 2022
Blender Camera Switcher

Blender Camera Switcher A simple camera switcher addon for blender. Useful when use reference image for camera. This addon will automatically fix the

Corgice 1 Jan 31, 2022
HomeAssistant - Polyaire AirTouch 4 Integration

HomeAssistant - Polyaire AirTouch 4 Integration Custom integration to add an AirTouch 4 AC Controller Installation: Copy contents of custom_components

7 Aug 05, 2022
Pinion — Nice-looking interactive diagrams for KiCAD PCBs

Pinion — Nice-looking interactive diagrams for KiCAD PCBs Pinion is a simple tool that allows you to make a nice-looking pinout diagrams for your PCBs

Jan Mrázek 297 Jan 06, 2023
Robot Framework keyword library wrapper for atlassian-python-api

Robot Framework keyword library wrapper for atlassian-python-api

Marcin Koperski 3 Jul 29, 2022
Automatically draw a KiCad schematic for a circuit prototyped on a breadboard.

Schematic-o-matic Schematic-o-matic automatically draws a KiCad schematic for a circuit prototyped on a breadboard. How It Works The first step in the

Nick Bild 22 Oct 11, 2022
Self Driving Car Prototype

Package Delivery Rover 🚀 This project is a prototype of Self Driving Car. It's based on embedded systems, to meet the current requirement of delivery

Abhishek Pawar 1 Oct 31, 2021
Custom component for MPC-HC for home-assistant

mpc_hc The current mpchc integration in homeassistant violates ADR0004, so it will be deleted from core. This is just the existing integration copied

3 Dec 15, 2022
Workshop for student hackathons focused on IoT dev

Scenario: The Mutt Matcher (IoT version) According to the World Health Organization there are more than 200 million stray dogs worldwide. The American

Microsoft 15 Aug 10, 2022